

What is a glossary?
- A glossary is a set of terms (pairs of the source term and translated term) that are to be used for the specific group or project. A glossary is used in Quick PE during the import process of the translation files, and also during the verification and re-translation processes in File Editor by linguists (translators and reviewers). You can set up a glossary with the following information.
- Glossary name
- Language (source and target language): Select from the following options
- Japanese:ja, ja-JP
- English:en, en-US
- Chinese:zh, zh-CN, zh-TW
- Term list: You can add terms one by one manually by clicking [+Add Terms] button. You can also add several terms in bulk by importing a file (tbx format). You can also add terms one by one to the imported (existing) term list manually.
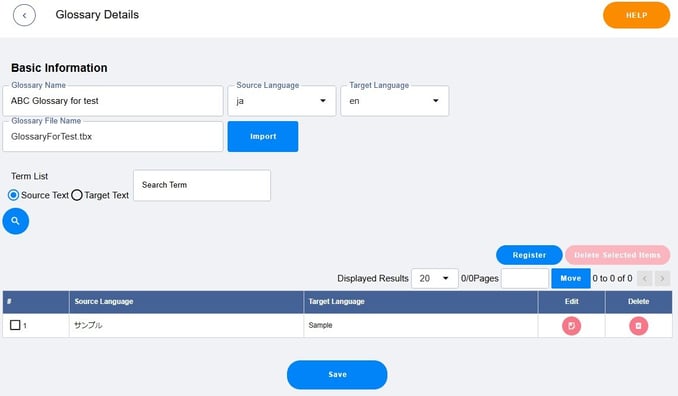
- To add a new glossary: In Glossary Details screen, select a tbx file for "Glossary File Name" and click [Import] button. Because once you click [Save] button you cannot import a tbx file any more, we recommend you to import a tbx file before adding a new term.
- To replace an existing glossary: In Glossary List screen, click [Import] button in the list. As this is an overwriting import, it will completely replace the selected glossary. The source and target language settings will not be changed.
- You can edit or delete the terms in the existing glossary. If there is a lot of terms in the term list, you can use the term search function to find the necessary term. Please specify the source/translated terms to search for.
<Glossary Details screen>
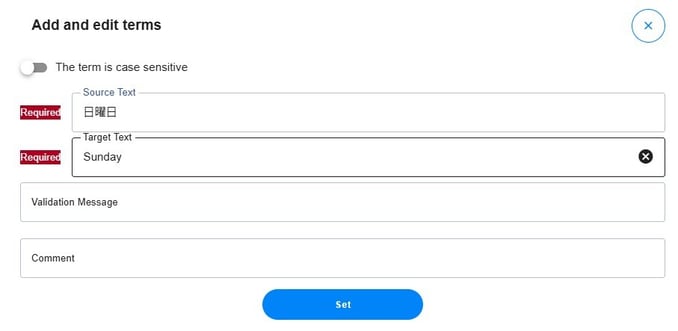
<Add and Edit Terms screen>
Each project manager can register multiple glossaries. Each glossary and term can be edited and deleted.
How to add a new glossary
- In Glossary List screen, click [+ Add New Glossary] button.
- In Glossary Details screen, enter any glossary name and select the languages (source and target) from the drop-down list.
- If you have a glossary file (tbx file), click [Import] button to load it into the system. If you do not have a glossary file, or if you want to add more terms after importing the file, you can add them manually in step 4.
- Click [+ Add Terms] at the bottom of [Term List] area to display Add and Edit Terms screen (pop-up), and enter the following information and save the term.
- Source Text/Target Text: Source and target text of the term. Enable [The term is case sensitive] toggle to make the term case-sensitive.
- Verification message: Enter a message to be displayed (for linguists) after the file is imported or when he/she executes the verification or re-translation functions in File Editor then a glossary violation is found. "Please check the translation from the glossary" will be displayed as the default message when you register a new term, but you can overwrite it with any one. We recommend you to provide reference information and context information (such as the usage conditions of the target term) that are useful for post-editing.
- Comment: These are notes for the project managers and will not be displayed in File Editor. This is not a required field, so please use it if necessary.
- Repeat step 4 until all required terms are registered, then click [Save] at the bottom of the screen to save the glossary.
- The saved glossary will be displayed on Glossary List screen, and you can edit it from [Edit] button or export it from [Export] button.
Available files for import
Please note that the following restrictions apply to files that can be imported as glossaries on Glossary Details screen.
- Supported file format and extensions: tbx
- File size: 500MB
- Number of lines/characters: No restrictions
- Language pair (direction): Both the source and target language is included in the supported language codes (see above)
About the language settings of the glossary
Since a glossary consists of pairs of terms in two languages (source/target), you can specify either language as the source (and target). For example, when you import a glossary (tbx file) which contains the term pairs of "en" and "ja", if you set the source language to "en", the English term will be registered as the "source" and the Japanese term will be registered as the "target". Likewise, if the source language is set to "ja", the Japanese term will be registered as "source" and the English term will be registered as "target". However, only one source/target pair can be set for each glossary. You cannot save both "en" source term and "ja" source term in one glossary.
How to specify a glossary to use in a project
- After registering a glossary, you can select glossaries to be available for the group in Group Details screen. Only glossaries registered in the organization can be selected in the screen. You can select multiple glossaries for each group.
- Next, select glossaries to be available for the project in Project Details screen. Only glossaries available for the group, and those both source and target languages are identical to the project's first priority MT engine, can be selected in the screen. You can select multiple glossaries for each project.
- You can delete a glossary even if it is currently being used (selected) by a group or project. If you delete data from [Delete] button at the bottom of Glossary Details screen, you will not be able to reference it in the verification process on File Editor screen even if it is already selected on Group Details screen or Project Details screen.
Languages (with or without locale)
- You can select the language direction (source language and target language) of the glossary from Japanese, English, and Chinese.
- You can set the language code with locale (ja-JP, en-US, zh-CN, zh-TW) as necessary. * These language codes with locale are mainly intended for importing glossary files with locale settings. You can also specify a language code without a locale as the source/target language of the glossary when you import a file with a locale.
前の記事

言語資産管理(ストックデータ一覧)
次の記事
Change Account Information